Review: Epicardio Simulation v1.5 (Trial)

EDIT:

After writing this review, I got my hands on the full version. So this review continues here.

Epicardio offer a 60% discount to full-time students

Download for Windows/OSX:

  • Trial (Free)
  • Paid (£149-£215)

Developer: Epicardio.ltd

Studying ECG can be one hell of a mountain to climb, especially when you’re at the novice level of cardiac education. Due to how vital it is, it’s imperative that you can not only make the distinction between Mobitz II AV Block and sinus arrhythmia, but also understand the intricacies of the cardiac conduction behind them, and all of the other rhythm abnormalities. Learning these things like the back of your hand is one thing, but combining all that knowledge is, at times, overwhelming. So after 12 months of scouring the internet, trying to find a decent cardiac anatomy and 12-lead ECG simulation tool, I was over the moon to stumble upon Epicardio Simulation; a cardiac electrophysiology tutorial application, developed by Epicardio ltd.

Screenshot (175).png

The program is available in 3 main forms; Epicardio ECG, ECG and Pacing, and 3-day trial. As I don’t have £149 kicking around (the price of the basic ECGcentric offering), I can’t review the full version and all of its features, but the 3 day trial version (which is £0), is well within my price range. Thus, I shall only be commenting on the features with which I have been able to sample.

Thankfully, the collection of features available to trial version users is still extensive, so I have lots to cover, and perhaps I’ll spring for the full version when funds allow. The question is: does the trial impress enough to warrant the large expense? Let’s investigate further:

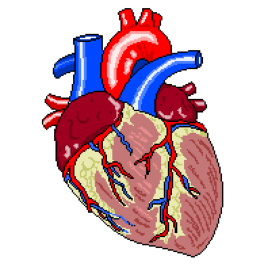
Almost as soon as you open Epicardio, the vibrant display hits you; a large, anatomically accurate heart fills most of the screen as colourful depolarisation waves travel across the atria, and down through the ventricles. The live single lead ECG tracks with concordance, and the right hand menu buttons are nicely presented and clearly display exactly what they do.

2016-07-27 (1)

Depolarisation mechanics can be viewed through the heart as a whole, or each section on its own. Atria, ventricles, bundle branches and coronaries, can all be viewed independently whilst depolarisation occurs, so it’s possible to learn how the various components of the cardiac system operate during each cycle.

Further structural overlays can be added, in the form of the vena cava, thoracic cage and a translucent torso, further adding to the ability to understand the heart’s positioning in humans.

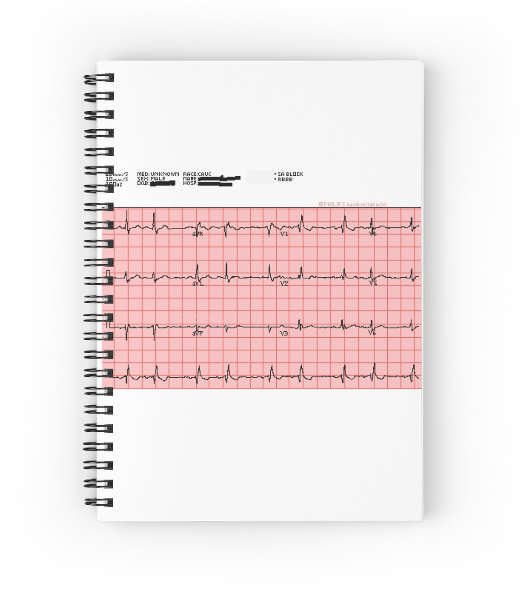
The electrical readout on the lower region of the screen comes with the option of cycling through all 12 leads on the standard ECG, individually, but as well the real time single lead ECG, users can also activate a live 12-lead, which again updates in real time with each cardiac cycle. This mode itself allows for different viewing styles, including the layout presented on most standard ECG printouts, which is perfect for students. It also features all the subtle morphology differences and minor, unavoidable muscle tremors that one would find on a real ECG recording. Calipers are a welcome feature, too, and they work well in Epicardio, allowing for measurements that students will definitely have to become proficient in throughout training.

Screenshot (188)

Further customisation options are numerous; the colours of the depolarisation waves are changeable, as is the colour of the backdrop. Rather than simply offering pre-set rhythms, Epicardio allows you to manually alter heart rate, and, possibly more importantly, AV delay, so it’s possible to visibly alter the depolarisation wave on the beating heart in the centre of the screen, and see the  live trace display a prolonged PR interval.

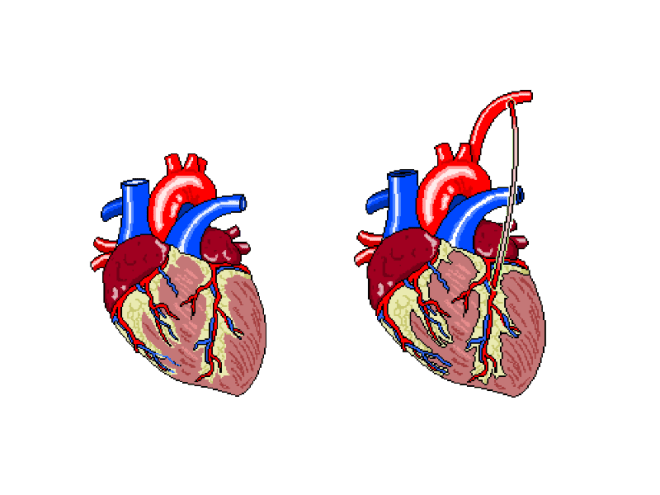
A most welcome feature is the electrode view option. A click on this button brings up a moving image of the heart within the thorax, and the standard precordial electrode sites. These electrodes can be moved anywhere and the real-time result displayed on the recorded trace, so it’s rather nice to be able to explore the difference in the voltage/time graph that occurs with electrode misplacement.

A defibrillator option allows you to shock the heart, although this was of limited use to me, as I did not have access to the fibrillatory rhythms that come with the paid version, but the artificial pacemaker below it allows the user to alter pacing pulses and observe the changes on the ECG.

Screenshot (172).png

My issues with Epicardio range from those that exist simply because the version I tried is restricted, to those that are nought but minor niggles, so I shall focus on those minor niggles, as oppose to content I simply have not paid to access.

The ECG trace, whilst being incredibly customisable, would feel much more authentic if it were set against a proportional image of standard ECG paper; being able to view the trace against the background most students will see throughout studies would be a great primer in the early days of study, and considering the trace speed is adjustable, I was disappointed it wasn’t a feature.

The option buttons look lovely, offer genuine function and, once you’ve been through the tutorial and played around with them, make perfect sense. It would perhaps be helpful if a brief explanation appeared when the mouse pointer was placed over each one, however, as it was a struggle remembering what the more vague options actually did, especially for the first few hours of using the program.

However, as I stated, these are only minor gripes. Epicardio is a wonderful and genuinely fun bit of software to use. I’ve got a feel for how beneficial having this in the beginning of my studies would have been. The layout, options, functionality and simplicity of using Epicardio are all near-perfect, so I can’t wait to get a hold of the full version, complete with pacemaker-specific options. If you have a spare weekend, then follow the link at the top of the page, and download the free trial. If you have a spare £149/£215, then follow the same link and download the full version, as if it’s provides even 50% more features than the demo, I can be certain it’s worth it.

I will review the full version as soon as I can.

Screenshot (192)

Screenshot (6)

Advertisement

New Art!

I’ve added some new work to the online store. Head over there and you can find work inspired by Torsades de Pointes, an anatomical representation of a pacemaker in situ and an illustrated (and truncated) chronology of pacemakers (I’ve been doing some pacing).

As with those already up, these designs are available on mugs, books and smartphone cases, as well as clothing.StoreImage2

Remember, every penny made via sales goes straight back into this website.

Thanks!

Screenshot (6)

Teaching

I’m not sure how many students know this, but once you’re qualified and working within a trust, a part of your job description denotes the expectation that you teach those who come after you, regardless of your job title or profession. Those mentors and staff that answer your questions whilst you’re on placement don’t get paid more for doing so and, for the most part, they don’t have special teaching roles. They do it to help and inspire you, and others, into being the best healthcare professionals that you can be, and one day, you’ll do that too.

I had my first taste of this, last week, when myself, fellow TSP writer OliGS and another student, along with two qualified physiologists, gave tech demonstrations, took Q&A’s and generally outlined the profession to a large group of medically-inclined 6th Form students. Oli had the joy of lying still and having successive Echo exams performed on him, but myself and the third student gave some ECG and BP demonstrations to small, rotating groups of young adults. They engaged a lot more than I initially thought they would, given that it was a hot day and the session was scheduled directly after lunch, but with a bit of cajoling, they performed simple 3-lead exams on one another, and took each other’s blood pressure. We answered all of the usual questions…

“Will this hurt?”

“Are you allowed to tell me if this shows I’m going to die”

“Will this electrocute me?”

…which aren’t entirely dissimilar to those put to us by patients, so it actually meant giving the same spiel, in response.

It was nerve-wracking, speaking candidly about your studies to strangers, especially when you don’t know at what level they are, with regards to cardiovascular anatomy, and when boring them is the last thing you want to do, so ensuring we spoke with enthusiasm was paramount. Perhaps unsurprisingly, only a couple of the students actually knew that HCS existed, so that added more of an incline to the mountain it felt we had to climb, but I’d happily do it again, as even one converted student feels like a victory, considering it was the first time I’d done anything like this. They seemed genuinely intrigued by diagnostics, and, after the aforementioned questions, asked some really challenging things about our role in wider healthcare, as well as about the equipment and techniques themselves. It’s odd to know that young students aren’t informed of all of the opportunities available them when they enter higher education, and it highlights the need for more publicity surrounding the scientific careers present in the process of patient care.

It’s difficult to know how to publicise this vein of science and healthcare, but there has to be a way; the disciplines and specialisms within it are at the forefront of diagnostic medicine and research, and are a truly rewarding endeavour for those willing to persevere through the sometimes unforgiving education pathways. If I’m invited back next year, I hope to convey some of that sentiment to the next batch of hopefuls, as, like me, they won’t look back once they start.

Thanks.

Screenshot (6)


TSP Merch!

After creating so many illustrations for the various study pages I have added (and a few future ones), I thought it might be nice to put them to more use.

To this end, I have set up an online store HERE.

Many of the original images you see on this website can now be worn, written in, or used to hold beverages when you’re on placement! A selection of the items available are on display here, but do go and check out the store to have a look at everything on offer. They’re all of a high-quality and available in a variety of styles, too, so I hope you find something you like.

I’ll keep adding new designs, so be sure to check back often, and every penny made through sales will go towards furthering this website.

Screenshot (126)Screenshot (127)Screenshot (128)Screenshot (125)Screenshot (123)

Thank you!

Screenshot (6)


Review: BMJ Best Practice

Download the IOS app: Free

Download the Android app: Free

(In-app Purchases: £5-£60 approx.)

Developer: BMJ, London


BMJ Best Practice is an app that aims to aid diagnosis and guide the practitioner through the treatment process of a number of pathologies. Guidelines on examinations, tests and medications are provided across 977 topics. These are not all available initially; some conditions are presented as a free sample, whilst the rest must be purchased either in one go (£59.99), or by categories such as Critical Care and Emergency Medicine (£15.99), and Cardiovascular Disorders, Vascular and Cardiothoracic Surgery (£7.99). Institutional access is available, so if your trust/ university subscribes to the service, you can access all of the content for free.

BMJ Phone


These are the good things BMJBP does. Unfortunately, it does a great deal worse when it comes to every other aspect of its content and execution.

Whilst the level of content is very good, straightforward and to the point, it’s unlikely that you’ll actually get to see any of it, as the sample pages don’t always load, and when they do, they don’t save. Frequently, I left the app to take a call, and returned to it to find it had rebooted. In addition, whilst the developer’s ability to extract the subscription fee for paid content suffers no problems, their ability to supply said content is non-existent. I purchased the “Cardiovascular Disorders…” category for £7.99, and was told by the “My Topics” section of the app, that I didn’t own any of the documents, yet was told by the “Subscribe” page, that I did..! Either way, I couldn’t (and still can’t) view any of the content I have paid for.

I sent an email over to the BMJ customer service department, and was politely informed that subscriptions were handled by Google, and there was nothing that BMJ could themselves do. As it turns out, subscribed content is entirely the responsibility of the BMJ, so when I pointed this out, and asked for a refund, I was met with a wall of silence that is currently ongoing.

Although it may be tempting to download this app, I strongly recommend that you do not; the content isn’t there, the app itself is buggy and the developer’s desire to help with problems is as present as the paid topics, in that both have yet to materialise. Judging by the user reviews left on Google Play, I am not the only user to have faced any of these problems, so it’s not as though the devs are unaware.

This app doesn’t do enough, regarding functionality, to warrant being this unfinished. It genuinely frightens me to think that someone was paid a wage to develop this, and even more frightening, is that the BMJ are charging for content, despite the numerous complaints of bugs and such. The app lists its last update as 2015, but lord knows what it addressed, or how much worse it was before, if this is considered sufficient.

This, dear reader, is how NOT to make a mobile app.

Screenshot (181)Screenshot (6)

Coronary Artery Bypass Graft and Mitral Valve Repair

I had the rather marvellous opportunity today; spending a day in cardiac theatres and, under the guidance and tutelage of two cardiac surgeons and an anaesthetist, learning the processes and methodologies behind CABG and MV repair.

I arrived at the Bristol Royal Infirmary surgical centre at 7:45am and was quickly changed into some scrubs and inducted into the OR’s team: three surgeons, two anaesthetists, one perfusionist and a selection of nurses both scrub, and regular. It was clear to me that each of these individuals knew one another well, just by the way they talked to each other; everyone seemed at ease with the rest of their colleagues. It turns out, I was right. Many of them knew each other from other hospitals, university or simply having been mentored by each other during training. This camaraderie bled into the surgery, as each team member knew not only their role, but that of the others, also, so equipment was passed over or set up without being requested, making for a seamless procedure.

The patient was, until the last year or so, a very fit and active 79y/o, who had suffered from AF for at least 10 years, and had developed a stenosed left anterior descending coronary artery as a result. In addition, echo had shown a severe mitral regurgitation due to valvular prolapse. The procedure would attempt to bypass the LAD using the left internal mammary artery (LIMA), as shown below.

LIMA bypass graft
Figure 1: The left internal mammary artery (shown in situ on the right) is relocated from the chest wall to bypass the stenosed section of the LAD.

The plan was to perform the bypass graft, and then set about repairing the damaged mitral valve.


After the patient’s ID and contraindicators had been checked, the anaethetists set about carefully monitoring their respiratory and cardiovascular function as the GA took effect. The ECG, arterial and venous pressure traces were available on lots of screens around the rooms, as whilst they must be monitored all of the time, it becomes particularly important to keep an eye on the given values as the heart is both stopped and re-started.

Interestingly, I noticed a pattern in conversation with each patient throughout the day, as the anaesthetic was administered. The patient was asked to think of their favourite place and the team then asked where that place was. Each time, this was met with silence, but just to make sure, the patient was always asked if they were warm enough. When no answer was forthcoming, they were wheeled into the theatre room proper.

Not everyone on the team was scrubbed up and sterilised, as obviously some would not be required to touch the patient, and others would be required to fetch replacement equipment should it be needed. This created a “sterile field” around the operating table, so only sterile members of staff were permitted within it.

After 1 hour and a whole heap of sterile gowns and drapes were applied over the patient, with only a small window showing the surgical site, the operation began.

Step 1 required access to the thoracic cavity. In case of blood splatter, masks fitted with facial protection were supplied to myself and the other team members who would be in the direct vicinity of the patient when the chest was opened.

Full Face Mask

An incision was made as illustrated below. This is known as a median sternotomy, and extends from the sternal notch to the xyphoid process. In order to progress past the sternum, an oscillating saw is used to cut throught it. There is a surprising amount of finesse involved in this stage, despite how much pressure is required and as a result, how brutal it appears.

Screenshot (74)

The incision is deepened and cauterised until it travels through the pericardium, so as to allow access to the heart and, after the bleeding vessels around the wound are cauterised, a finochietto retractor is used to hold the sternum open. During this time, the LIMA is found and carefully removed from the chest wall. It is then held in an accessible place with forceps, to be used later.

Screenshot (75)

Lung and cardiac function is transfered to a cardiopulmonary bypass machine, which allows both the heart and lungs to be stopped/emptied, allowing even greater access to the heart due to the lack of lung obstruction, and intricate work to be perfomed whilst the heart is not beating.

Screenshot (76)

The cardiopulmonary bypass apparatus purifies the blood that passes through it from the patient via cannulas placed in the heart and pumps it back, thereby doing the work of the heart and lungs. The heart is fed nutrients at the same time, so as to keep it healthy for the extended period of inactivity. This method of on-pump surgery is known to be incredibly safe- between 1 and 2% of high risk patients will suffer adverse effects as a result of the treatment, and surgical teams are well versed in assessing this via risk factors.

Once the LAD has been correctly identified, an incision is made, creating an opening that roughly matches the size of the end of the LIMA, and the two are stitched together using sutures made of polypropylene,which are no thicker than a human hair, yet can withstand the pressure that would be required to rupture a healthy vessel. To test the suture site, blood is passed through the vessel, and in the event of any gaps in the connection, this blood will be seen outside of the join, which can then be further secured as necessary.

The process, whilst quick to document, was a long one, as each step of the technique was scrutinised carefully before considered complete. In addition, each stitch required at least two people directly, to exact it; one to add the suture, and the rest to support the structures surrounding it.

The second stage of this case was the mitral valve repair, which was in itself a multi-stepped procedure. It is possible to repair a damaged mitral valve using less invasive, keyhole methods, but due to the need for a bypass graft, this wasn’t an option this time.

After gaining access to the valve itself, via an incision in the left atrium, the condition of the valve leaflets is assessed. This particular patient’s posterior leaflet had a prolapsing middle scallop, which meant that the below procedure was necessary to repair it.

Screenshot (77).png

The process off attaching the ring was a long one, involving a lot of organisation and intricate knotting. The sutures are applied to both the ring and the valve, the latter is then gently pushed down the threads and into place. These suture strings are then tied off and cut.

temporary_1464194828160.pngOnce this has been completed, the valve integrity and functionality was tested by flushing water through the heart. In this case, the valve was still slightly prolapsing, as the water flushed through the valve in an unwanted quantity. The entire process, then, was considered from the beginning, and the valve only said to be repaired, when the regurgitation seen through the valve was minimal.

When performing the annuloplasty removed the surplus anterior leaflet, it took with it a tendineae chordeae, so in order to stabilise it further, an artificial heart string (made of Gore-Tex) was attached to the leaflet and papillary muscle.

A final transesophageal echo was performed, to assess the level of air still present in the heart, and to then assess the function of the repaired mitral valve, and after all of this was successfully accomplished, the long task to gently remove all of the cannulas that were used to bypass the cardiopulmonary system were begun to be removed. Each chamber was sutured in sequence, and the corresponding section of the perfusion apparatus turned off. All of this time, the anaesthetist monitored the patient’s drug infusions and every member of the team monitored pressure and ECG traces. This was still going on whilst the SpR set about cauterising vessels and wiring the sternum before pulling it back together. None of this section of the procedure involved any real finesse; pulling the wires taut so as to close the chest cavity is a test of strength. Each pull caused the patient to move for the first time since coming into the theatre, so I guess that was why it was the only section of the surgery that almost made me wince (something the theatre lead noticed and laughed about). Once it was done, the multiple layers of sutures were applied to seal the surface wound and the patient was taken to recovery.

In all honesty, the most difficult part for me, was in standing for so long. This was echoed by the surgeons, who said that they always felt backed up by their colleagues, so they felt confident that the procedure itself would go well, but standing, often in an unnatural position for so six hours at a time played havoc with their backs and legs. The anaesthetists, being required fully at the beginning and the end of the surgery, spent a great deal of time sat waiting, save for occasionally changing an infusion as and when required. The people working solidly were the surgeons and the scrub nurse, but even the surgeons swapped roles, observed one another without participating, and even took breaks periodically. None of this diminishes any one role, however; each member of the team was required, be it constantly or otherwise, and when one was needed, it took a single word for everyone in the room to know what was required, and by whom. Despite the procedure itself being amazing, it was the mechanical and seamless nature of the professionals in the room that was the most astounding part of the day.

Screenshot (6)

Introduction to Pacing

Exams are over, coursework is in, and I’ve FINALLY got some time to devote to TSP, so I’ll endeavour to post updates with the same level of regularity as I did a few moths ago. It’s been a while since I added anything other than study pages, so it’s proving difficult to get back into the swing of reflective writing. I shall try to be clear, however.

The first week of my 15 week placement has been an interesting and challenging one. I’ve been in pacing clinics (the third of which allowed me to have some hands-on experience), tape clinics and have analysed my first full 24 hour ECG recording, so the amount of information I’ve absorbed has been of a high volume in a short space of time.

I’m not going to comment on tape analysis or clinics just yet, as I’m yet to have my completed work assessed, so I’ll wait until I’ve gained some feedback on my current performance. Pacing, however, is extracurricular, so I’ll glady share my experience.

Pacing checks were very fun; during eight or so hours of lingering/observation, I was gradually allowed to do a bit more with regards to clinical practice; analysing lead outputs and EGM readings, setting up programming equipment and learning my way around each box-specific bit of software, etc.

The majority of patients that came into the clinic were annual follow-ups, and six week post-insertion assessments, wherein the overestimated pacing parameters are altered so as to preserve battery life, and due to their nature, each was simply a case of checking each value and adjusting accordingly, meaning each 15 or 20 minute consult went off without a hitch, and I got a feel for the regular procedure and could have some of the physics explained to me. It also allowed my tutors to ask me questions and test me a bit.

The third and final clinic, however, allowed me to assume the role of primary (under strict supervision, of course) and perform threshold tests on my patient. It’s amazing how quickly it’s possible to forget everything you’ve spent the last few days learning, when it comes to actually doing it; the sudden pressure of being thrown into practical learning caused my mind to go completely blank, but with a bit of time, I settled into the role and things started to make sense as I was doing them. There’s a really overwhelming feeling of resposibility when you’re charged with manually increasing or decreasing your patient’s heart rate during threshold tests, and in addition, spotting the loss of atrial capture is, in most cases, far more difficult that that of ventricular capture. It was an exillerating experience, though, and I really felt like I had accomlished something at the end of the clinic. In three days I felt like I could quantify my progression, so the first week has left me feeling excited for the rest of the placement block.

Until this week, I’d never considered pacing as a future specialism – I was focussed on echo –  but getting some real exposure has shown me how much I could enjoy a future in the discipline. I can’t wait to do more.

I’ll write more about my own research into pacing as I do it, so keep an eye out for that.

Thanks!


Screenshot (124)

Review: Acadoodle

Acadoodle.comonline

Price: $99/ £66 per annum (approx)

Authors: Dr John Ryan, Dr John Seery

Acadoodle is a subscription-based online resource for ECG training that boasts a large selection of video tutorials which can be viewed individually, or as part of a tested course. The ECG Teacher sections are the primary focus of this review, but other courses such as blood gas analysis are available, however.

Screenshot (67)

Produced by Drs John Seery and John Ryan, I found these courses to compliment my study, and even when I wasn’t watching them directly, I found myself letting them play in the background as I read a textbook, or went over my lecture notes.

The videos themselves are well produced and make understanding the ECG and its subsequent analysis much easier. The animations are slick and the narration is clear, concise and full of all the pertinent diagnostic information you will require.

Screenshot (68)

Each area of study is tailored to a specific area of electrocardiogram diagnostics, so each playlist/module flows from one video to the next. In addition, the flow of the modules themselves makes sense, and the learning curve increases in a logical order and as such, each section follows on from the one that precedes it in a manner that doesn’t overload you with information before you’re ready.

A small selection of the videos are available on YouTube, so if you wished to try before you buy, then searching for “Acadoodle” would throw up some of the more basic tutorials for you to have a look at. I noticed that these YouTube videos are also embedded in the Acadoodle site proper, giving rise to a sometimes noticeable drop in picture quality, on occasion.

Screenshot (65)

It’s nearly impossible to fault the content and structure, as these videos have helped me immeasurably throughout the last six or seven months, but it is an expensive purchase for anyone, let alone students, especially when you consider that almost all of the content is in some way available via lectures or found in other, similar video courses on YouTube. In that respect, despite the quality of the content, I find it hard to recommend Acadoodle to physiology students who are considering purchasing a personal subscription, but for lecturers or professional bodies and universities, it should prove to be a valuable asset when clarifying concepts to a class full of students.

That isn’t to say that a student purchasing a subscription wouldn’t get a lot out of Acadoodle; it’s certainly worth it, it’s just expensive at a time when disposeable income is generally spent on textbooks or… food and shelter. If splitting £66 is something that you and a few peers feel is possible, then I highly recommend it, as the website can be used from multiple PCs with little to no issue.

Screenshot (182)


Screenshot (124)

Synap: Beta Test Update

Synap is an upcoming revision tool that is driven by students. The platform enables students to create their own multiple choice questions and upload them, then download those created by others. It’s possible to “follow” other users, as you would someone on Twitter or, incidentally, this site (you can do that in the sidebar of this page…), and take any quiz that they have created. Image upload and basic editing is supported, so quizzes for physiology, such as ECG arrhythmia or echocardiography quizzes are more than possible, and are one of the reasons I decided to get involved with the whole thing. In addition, the app tracks your progress and structures your revision for you, based on your course and modules.

I’ve spent the last week or so beta testing the Synap web platform or, more specifically, I’ve been taking tests and creating basic ECG quizzes to help bug test and check functionality.

The platform, as I’ve mentioned, is currently in closed beta and only present on the web, so without having an app and a larger number of users I cannot comment on it fully, but as it stands, the processes involved in creating a profile and quiz are incredibly simple; adding and annotating images is a cinch, and a complete question only requires the user to add a correct answer and a few wrong ones. Whilst I encountered a few bugs initially, the feedback I provided was swiftly taken on board and the problems were remedied overnight. Taking quizzes is incredibly simple, and all you need to do is click “take quiz” (shockingly), then select your answers and have them marked. You can take these as many times as you like, too, and if the creator has provided any, feedback will be available for each individual question.

My only concern is the reliance on the quiz-maker supplying the correct information. I’ve taken a quiz wherein the correct answer was the only one that was possible to be correct (think “What has tusks and a trunk? 1) Elephant 2)Belephant 3)Your hamster”) yet I was still told my answer was wrong. This is a closed beta, though and that’s what these processes are for. I know it hasn’t escaped the attention of the developers, so we shall see how it is dealt with.

To break all of this down and show you what I know for sure so far, have a look at this (incomplete) features list:

  • MCQs:
    • Image/annotation upload
    • Correct answer & up to 5 incorrect
    • Optional feedback for test-taker
    • Optional link to external learning resource
    • Test result calculation
    • Obtainable achievements
    • Personalised revision quizzes sent to you
  • Community links based on:
    • Course/Discipline
    • Cohort
    • Institution

I’ll add to this list the more familiar I become with the platform.

Omair and James, its creators, and the rest of the Synap team hope that this app will enable students nationwide to help each other and revise together, and it’s a pleasure for me to be involved, even if it’s only in a small way, currently. I’ll continue to post updates as things progress.

For more info, visit @Synap on twitter.

Thanks

Screenshot (39)


Being A Patient: Part I

(or “what I learned when the tests I have done to others, were done to me”)

The tests presented in this post are intentionally not explained thoroughly here. I have focussed, currently, on patient experience. If you wish to learn more about the things presented here, and the interpretation of the possible results, wait for them to be explained in your lectures, or, perform a quick Google search.

Before the new semester began proper, I was asked to assist with some physiology practicals on my campus. I agreed because I felt (much in the same way a chef will sample his/her food before selling it to the masses) that it would be good for my overall learning to experience the same anxieties and physical exertions -if applicable- that a patient may endure when they undergo physiological testing. When one repeatedly performs tests day in, day out, it’s easy to forget that the patient likely does not have anywhere near the same levels of familiarity with the procedure and proficiency with them as that of you, the practitioner, so to gain an insight into the emotional and physical aspects from the other side would, I felt, be good practice.

Day one was one of a cardio nature, in that I performed lots of exercise tests at a physiologist’s disposal. (Some of these tests are reserved for respiratory physiologists, but if you’re studying and are not yet at the point of choosing which PTP pathway to follow, you’ll experience these, too).

I discovered upon entry, that I would be performing the following:

  • YMCA step test
  • Bleep test
  • Treadmill test: ramp protocol (similar to the Bruce Protocol)

The wait to enter the lab was, (obviously not the same in terms of anxiety levels, but regardless) akin to a patient’s wait to enter a clinic testing room; knowing that I was going to have to perform tests, but not knowing exactly what they were was rather nerve-jangling (especially considering my then-unknown weight gain after the obligatory food-filled, sedentary lifestyle commonly experienced over the festive break).

The real difficulties stemmed from trying to comprehend the techniques required for each test. Explaining, or writing about them is one thing, but actually doing them is another thing entirely.

The YMCA step test itself wasn’t particularly challenging, given that it only involved 3 minutes of steady box steps. The difficulty came in not influencing heart rate on recovery. Knowing that my HR was being documented every minute meant I kept looking at the oximeter, and as has been documented (a quick google search will give you confirmation of this), it is relatively easy to change your HR on command.

For a patient, this last point may not be of particular issue, given that they might not be particularly aware of the potential influence they can have on their HR, but I can easily see how repeatedly stepping onto and off of a box could be difficult task for a patient of advanced age.

20160106_110127 (2)

Bonus Clinical Perspective: In this test the Heart Rate Recovery and VO2 max doesn’t appear to be particularly accurate, when using normal values, especially when compared with the VO2 max displayed through the other tests, either. The values are based on age, as oppose to individual physiological characteristics, so assume a physical ideal that doesn’t necessarily transcend to real life.  

The bleep test wasn’t like ones I have previously attempted in the gym, or what have you; rather, it was more about timing, ensuring there were no stops. This involved slowing down so as to reach the end of the designated track in time with the beep, then speeding up to repeat, meaning that pacing yourself was a must. The resulting strain on my legs caused them to become incredibly painful, incredibly quickly..! (I’m aware that bleep test procedure differs between fitness centres, so forgive my whinging if you use this format regularly).

Encouraging a patient to exhaust themselves doing this test would take a great deal of commitment from both parties; I’m not particularly unfit, but I had nothing tangible to aim for, with regards to an end point, so with no time to “beat”, I didn’t have anything to work towards and as a result, I gave up after 10 or so minutes, despite the fact I could have carried on for a while longer.  For the average patient that would frequent clinics to perform this test, achieving maximal exertion may not be something that can be coaxed out of them, especially if they had already endured other tests in the same day.

Already I was beginning to understand the plight of the patient, when it comes to tests that require their full participation, and I still had the hardest one to come… I was not looking forward to the post-lunchbreak activities.

It turns out, the Ramp Protocol test was actually the most enjoyable of the day. Perhaps this was simply because I was growing used to being fatigued/dehydrated, or perhaps it was the setup of the test itself, but I could have happily continued running on the treadmill for a great deal longer than I did, time allowing.

The ramp protocol treadmill test involves the face mask setup presented in the pictures, and a steady speed and incline increase on the treadmill for as long as it takes for the patient to reach their VO2 max, but it is up to the patient when they stop. Unlike the bleep test, which involved travelling at an uncomfortably slow rate at times, the ramp protocol was a fairly rapid journey to a pace similar to that of a distance runner. It was far from comfortable, so would still require a great deal of coaxing and encouragement in order to get the patient to work hard to complete the test, but it was certainly more comfortable than the test that had preceded it.

The whole day not only reminded me of tests and theory that I had almost forgotten, but it really helped me to understand what a patient has to go through when they visit a hospital. The feelings and tests that I personally experienced were, on the whole, not pleasant, but I wanted to be there. For a patient, this will most likely not be the case. When your clinic list is seemingly never-ending and you don’t have time for restarts, it’s easy for the fact that patients don’t know the requirements and procedures as well as you might, to slip your mind, but thanks to this experience, it’s something that I’ll never forget, and I feel it solidifies a vital skill that students require to be able to operate efficiently and fairly: empathy.

Tomorrow brings a different kind of discomfort, in that I will be having my first echocardiogram. I’ll add that experience to part II

The ramp protocol will also get the full write up treatment, as it was by far the most complex and in addition, I have a detailed set of results.

Thanks for reading.

Christopher.

Screenshot (124)